The majority of modern watches in water-resistant cases will only require the movement’s parts to be degreased. This means washing off the old oil so that fresh oil can be applied. Many ‘old school’ watchmakers used benzene or pure Naphtha. In the modern age, both of these have been found to be bad for your health if inhaled.
You will quite often see watch repairers using lighter fuel as a modern replacement, as this still contains Naphtha. However, many watchmakers are blissfully unaware that modern lighter fuel is contaminated with a small amount of oil, making lighter fuel a very poor degreaser. Very small particles of oil will be left on any part that you try and clean when using this substance.
If you apply oil to the surface of anything that has been washed in lighter fuel, the oil will have spread by the next day. The only thing that lighter fuel is good for is cleaning mainsprings, and even then only when the fuel is applied to a lint-free cloth and used to wipe the spring clean.
Don’t be fooled into thinking that washing watch parts in degreaser is a quicker way of cleaning a watch. You would most certainly be wrong in this assumption. You would have to handle every single part and brush it whilst in the degreaser.
This certainly increases the chances of you losing something. However, if you are pressed for space and have no room for a watch-cleaning machine or ultrasonic tank, this is generally the only way for you to clean a watch.
Warning: When using degreasers you must use them in a well-ventilated area, and keep them away from plastics such as your plastic sink or your storage containers as some brands of degreaser may melt or discolour them. Most degreasers are highly flammable, so I would recommend keeping them out of direct sunlight.
To get started, you will first need a small jamjar, like the ones you get in hotels, or a very small Kilner jar. Fill this with some horological degreaser (such as Elma Spirol or Essence of Renata) and drop any parts into the jar to be cleaned.
Using an artist’s camel-hair painting brush or similar, loosen off any contaminate on the movement part being washed, paying extra attention to the teeth on the pinions/wheels. After soaking in watch degreaser for a few minutes, blot the parts on tissue paper and dry off with a few puffs of a watch repairer’s puffer or bellows.
Tip: Remember to be extra careful with the degreaser on your bench, as it can affect any plastic material it comes into contact with.
It is a good idea to give the jewel holes a final clean by using sharpened peg wood. You can use a watchmaker’s knife or a Stanley knife to sharpen the end of the peg wood to a gradual taper, not unlike a spear. This will be used to clean the oil sink in the jewel hole.
This is best done when the end is soaked in some degreaser and then used to clean a jewel hole. Try not to overwork the peg wood in a given jewel hole (about a half turn normally suffices), as it has a tendency to break off in the hole. Don’t be tempted to use one of the wheel’s pivots to push out the broken shard of peg wood, as the pivot will most definitely break off as well.
The best thing to use is an old oiler filed down to a fine taper, and push out the shard with it. Special care must be taken here, as pushing out the broken peg wood can result in cracking or breaking the jewel, or possibly even pushing it out.
Cleaning the balance wheel and spring
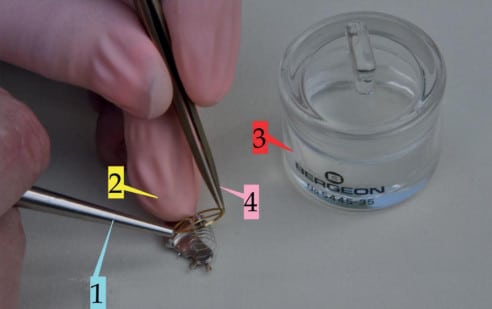
With the balance and cock lying on its back, pick it up by the hole in the cock and pop the whole assembly in a pot or essence jar filled watch repairer’s degreaser. After a minute lift the balance assembly out of the degreaser.
Again, pick it up by the hole in the balance cock and place it on the bench. Place your left middle finger on the fat end of the balance cock. With the tweezers in your left hand (as seen in Fig. 1), lift up the balance wheel, pulling it away from the balance cock.
Warning! Do not pull the cock higher than 1cm. If you do, you risk stretching the balance spring, making it unusable.
Using watch repairer’s puffer or bellows in your free hand, lightly puff a stream of air into the coils of the spring to dry it off.
Using watch repairer’s puffer or bellows in your free hand, lightly puff a stream of air into the coils of the spring to dry it off.
Warning! Do not be too vigorous with the puffer as there is a high chance of the coils of the spring becoming tangled.
Tip: Once the balance is fitted in the watch, you may find that the coils of the balance spring stick to each other, causing the watch to gain time. If this is the case you will have to clean the balance assembly again. This can sometimes be caused by dirty degreaser or oil on the balance spring. If you find that the coils continue to stick together, there is achance that this may be caused by magnetism.
If you have a compass, wave the balance or watch over it. If the pointer or hand moves, the watch has become magnetized. To rectify this, you will need a watch repairer’s demagnetizer.
Light/Medium Cleaning
A general rule of thumb is that the stronger it stinks, the better it cleans, so you will need to use these fluids in a well ventilated area. You will also need a compatible rinse to accompany the cleaning fluid.
Remember to check when purchasing the cleaner and rinse that they are compatible. At the time of writing, examples of companies who make both cleaning and rinsing fluids include Walker, Elma, L&R and HP Storey. Take three small jars, one filled with cleaner and the other two filled with rinse.
Two rinses are used because as you move the parts from the cleaner to the rinse some of the cleaner will contaminate the rinse. This means that a small residue of cleaner will be left on the surface of the cleaned parts. By using a second rinse, the parts will be free of any contaminate, helping to prevent the oil from spreading.
You could, if you liked, add a fourth jar. This one would contain degreaser as a final rinse. Once you remove the parts from the final rinse, use the blotting method to dry the parts, and use a watchmaker’s puffer or bellow to dry off the excess.
Ultrasonic Cleaning
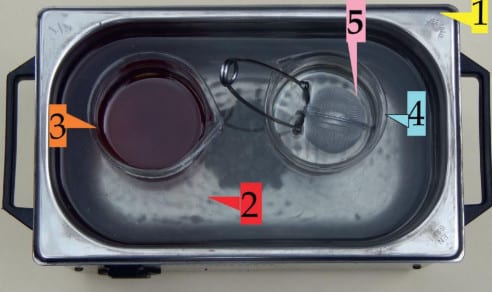
Normally ultrasonic cleaning involves a stainless-steel tank filled with a fluid. The tank passes ultrasonic waves through the fluid and these waves loosen any dirt particles from the object you are cleaning. They sometimes have heating units to warm up the fluid.
Professional watchmakers use these machines with just soapy water (water and washing-up liquid) to clean watch cases. This ensures the cleaned movement isn’t contaminated by detritus from the watch case when the movement is refitted, as watch cases and bracelets are dirt traps.
You can use these units to clean watch movement parts but the problem with an ultrasonic is that you would have to keep changing the fluid. Another problem is that the mesh of the basket that the machine normally comes with is too large, and most watch parts will fall though the holes.
If you fill an ultrasonic tank with water you can pop your little glass jamjars filled with cleaner or rinse in the water, turn on the machines, and the waves will penetrate through the glass, buzzing the parts inside the jar clean.
This method will also work with the smaller and cheaper battery-powered ultrasonic units; they are not as strong as the professional units but are certainly better than nothing, if you’re on a tight budget.
The parts can be individually dried with your watch maker’s bellows. Alternatively, they can be collectively dried in a box lightly filled with boxwood sawdust or drying granules such as Maizorb. This will soak up the remaining rinse left on the surfaces of the watch.
Chalk Brushing
Chalk brushing is a cleaning treatment traditionally used for antique watches. It is appropriate to use this method if, after cleaning with chemicals, the watch parts still seem a bit flat and lacklustre.
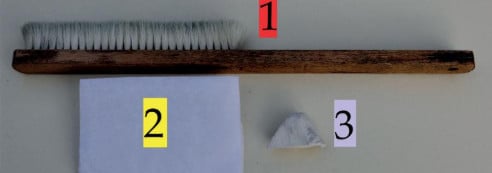
This requires a watchmaker’s four-row cleaning brush with soft bristles, newspaper, and a block of French chalk (easily bought from clock material suppliers). The technique is simple. Hold the part to be cleaned in the newspaper so your fingers are not touching the part being brushed. Charge the brush by rubbing it on the surface of a block of chalk.
Next, brush the part by dragging the chalked brush in a downward motion, starting from the top of the part and exiting on the paper. This has three effects: the chalk acts as a very soft abrasive, buffing the surface of the part. Secondly, the chalk acts as a medium for the dirt, stopping it soiling the brush.
Thirdly, the paper acts as a medium for the dirty chalk to transfer to. Don’t be tempted to rub the bush up and down as this will stop the dirt being transferred to the paper and will blacken the brush, negating its cleaning effect.
After brushing it is recommended that the parts are re-cleaned in rinse or degreaser. This will make sure there are no chalky deposits left on the parts. If this were the case, the chalk deposits could lead to wear.
Tip: This method of cleaning is very good for giving silver and gold watch cases a light buff.
Deep Professional Cleaning
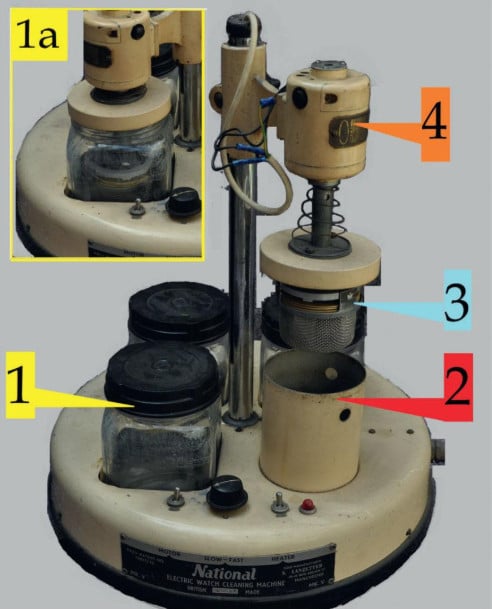
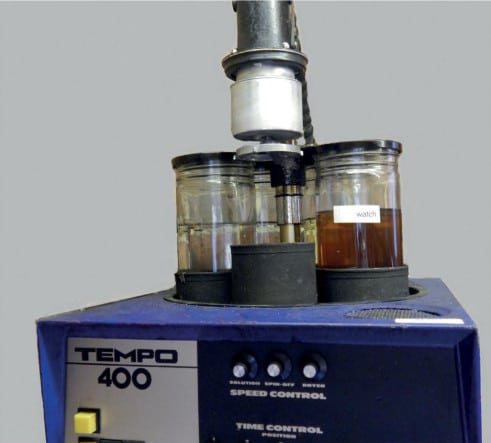
Deep cleaning is done using an electric watch-cleaning machine. These have been in service in watch workshops since the 1940s. They consist of three/four jars, similar to coffee/tea storage jars. The first jar is filled half way with cleaner, and the other two/three contain the same amount of rinsing agent.
There is an additional sort of metal jar with a heater inside: this is the drying chamber. A basket holding the dismantled watch is put in each jar, and is rotated in the fluid by an electric motor. The basket will be put in the cleaner first and will stay in there for about six minutes.
Most cleaning agents exert some sort of detergent action, so the jars are fitted with metal blades to prevent foaming caused by the cavitation (oscillation movement) of the motor. The basket will then be taken out of the cleaning fluid and spun for 30sec to get rid of the excess cleaner so as not to contaminate the rinse.
The basket is then placed in the rinse and rotated for 3–4min, taken out and again spun for 30sec, then placed in the second rinse, and so on until the basket reaches the last chamber, the drying chamber. Here, the basket will spin in hot air for approximately 3min. After that it will be raised up above the drying chamber and spun for a further 2min until the basket has cooled off.
Tip: The cleaning and rinsing fluids (exactly the same substances as mentioned earlier) are good for a maximum of fifteen washes, or until they start to looks like the colour of spiced rum. They must then be replaced, as they will have become heavily contaminated with oil, which will coat the surface of the plates and jewels as the basket leaves the final rinse; after a week or so the oil will spread. It is advisable to keep these fluids out of direct sunlight, as most of them are very combustible.
With the older/cheaper watch-cleaning machines, the basket is moved on from one jar to the next by hand. This means that these machines have to be nursed. The more expensive machines are fully automated, meaning you have spare time when one watch is being cleaned, so a second could be prepared ready for cleaning, or you have time for a cup of coffee.
It’s also worth mentioning that some models of automatic machines have a built-in ultrasonic unit which passes ultrasonic waves though the fluid so that a dual cleaning action takes place.
Tip: Please remember that these machines are also using noxious chemicals, so always use in well ventilated areas.
Disposing of Cleaning Fluids
Some cleaning fluids need to be disposed of at your local household recycling centre; others can simply be poured down the sink. It is very important, therefore, that you read the instructions on the label of each fluid you use, so you dispose of it in the correct way. If you are in any way unsure, contact the manufacturer, who will undoubtedly have a ‘Health and Safety’ sheet regarding the active components of each fluid.
Oiling
It was mentioned earlier that watch oil only lasts, on average, five to eight years. This average time is how long modern synthetic oils last before they start to decay or dry out. However, you wouldn’t leave five-or eight-year-old oil in your car, would you?
In the bygone age of watch repairing, animal oils were commonly used, such as whale oil; these have a superior lifespan, and were less likely to ‘creep’ or dry out as compared to their modern counterparts.
This is due in part to the fact that such oils contain fatty acids, which help them adhere to the surface they are lubricating; furthermore the composition of whale oil means that it acts like a wax as well as an oil, which helps it to stay in one place. That said, I for one, feel it’s rather unfair on the poor whales! So we have to make do with what we have, and rightly so.
In watch repairing we use minuscule amounts of oil, unlike cars that run in a bath of oil. Watches only need very small amounts of oil in very specific/precise locations. Most watch gears either rotate very slowly, with high torque, or have very little torque and rotate very fast, with little energy to keep them in motion.
This means you need to apply different types of oil to different parts of the watch, depending on these factors. The quantity of oil used in a watch is minute, but this small amount is distributed to every pivot on both sides of the watch. Grease is applied to the mainspring and the sliding parts of the keyless work.
There are many different types of oil on the market, and simply choosing which lubrication to use can become very confusing, not to mention which is best. Some people use just one type of oil, but in my opinion this is very bad practice, and is best left with watch repairers of the nineteenth century.
You can just about get away with three oils and perhaps one or two greases – though when buying your oils, you will need no more than 2ml of any type, and this will last years, even for a professional. I will assess the oils you will need for the type of person you think you are, out of three basic groups:
Hobbyist: The collector, dealer or tinkerer.
Amateur: The person who fixes watches for fun for friends, family and for a little cash.
Aspiring professional: The person wishing to take up watch repairing as a career.
The oils needed by each category are as follows:
Hobbyist:
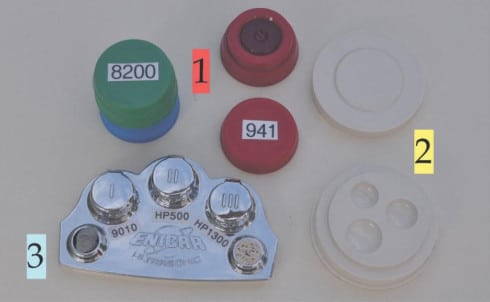
Light oil (escape wheel/third wheel/fourth wheel/balance pivots): Moebius 9010
Heavy oil (centre wheel/barrel arbor/barrel/motion work): Moebius HP 1300, or Moebius D-5
Pallet oil: Moebius 941/2
Keyless work: Moebius 8301 grease, or D-5 if on a tight budget
Mainspring: Moebius 8200 grease
With this selection of oils the most basic of watch repairs can be achieved.
Amateur:
Light oil (escape wheel/third wheel/fourth wheel/balance pivots): Moebius 9010
Heavy oil (centre wheel/barrel arbor/barrel/motion work): Moebius HP 1300 or Moebius D-5
Pallet oil: Moebius 941/2 and Moebius 9415 pallet grease (for fast beating watches over 19,800bph)
Mainspring: Moebius 8200 grease
Keyless work and upper crown wheel: Moebius 8301 grease
Aspiring professional:
Light oil (escape wheel/fourth wheel/balance pivots):
Medium oil: Moebius HP 500
Heavy oil (centre wheel/barrel arbor/barrel/motion work): Moebius HP 1300 or Moebius D-5
Cannon wheel grease: Moebius 9501
Keyless work and upper crown wheel and chronograph lever grease: Moebius 9504
Treatment of escape wheel/pallets and end stones:
Fixodrop 8941
Pallet oil: Moebius 941/2 and Moebius 9415 pallet grease (for fast beating watches over 19,800bph)
Mainspring grease: Moebius 8200
All the oils and greases mentioned I currently use or have used in the past, but they are certainly not the only oils you can use. If you talk to your fellow watch repairers, they will all have their own choice of oil/grease, and it is not for me to say their way is wrong.
All I can confidently say is, don’t be nervous of experimenting with new oils/greases, as a favourite oil/grease quite often becomes unfashionable and the quality seems to decline. My advice is always to use whatever the watch manufacturers recommend. If you can, obtain the data sheet from the movement manufacturer, as even they use different oils on the same movement.
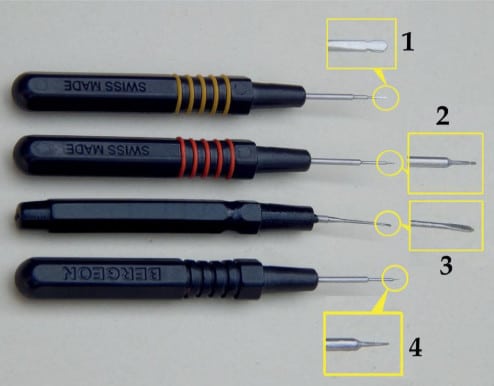
The Tools: Oilers
Oilers are normally sold in sets of four or five. The best budget sets are made by Bergeon and A&F Swiss. At a push, you can make do with just one black oiler called a three-in-one oiler (also made by Bergeon) if you are on a really limited budget. This oiler actually has three blades for the same handle.
The oilers I have just mentioned quite often need some sort of adjustment in order for them to work, but if money is no object then I can highly recommend Bergeon’s ergonomic oiler set. They are about seven times the price of the other oilers and they’re still as fragile as the cheaper oilers, but they are ready to use as soon as you get them home.
If your oiler looks broken when you purchase it, it probably isn’t. Pull the metal end out of the plastic and turn it round, as manufacturers insert the needle into the handle backwards to protect it (this is generally true for the cheaper type of oilers).
Another thing to note about the cheaper type is they often come with three spare blades per oiler, inside the handle. These often need to be coaxed out with a piece of sharpened peg wood or your tweezers.
To use the oiler, place the needle tip in and out of a pool of oil. This will charge it with a small amount of oil. To apply this oil to a watch’s pivot, the oiler must approach the pivot and its oil sink at a near right angle. To transfer the oil you must precisely touch the side of the pivot and the bottom of the oil sink.
Testing your oiler: Before using your nice new oiler it is always a good idea to have a play with it, to see if it performs in the manner it is supposed to. You commonly find the cheaper oiler never works as it should, and you need to make some modification to it to make it work as you expect.
Sharpening your oiler: The ideal shape for the end of an oiler (in my view) is similar to a screwdriver blade with a curved end. The cheaper oilers tend to look as if they have a turnip stuck to their end. My advice is to flatten the sides of the turnip blob, just as you would sharpen your screwdriver blade.
Use a diamond or oil stone, but remember to form the tip to a sharp point, as this will help the oil transfer from the oiler to the pivot or end stone. The oiler will become dull in time with use and will require sharpening.
Storing Oil
There are many types of oil pot, some more expensive than others. Ideally you need to have a separate lid for each oil pot, in order to keep the oil free from contaminants.
Some oils are used more than others, and this will help keep them fresh for longer. You must bear in mind that watch oils have been highly refined to be as free from impurities as possible: this makes them very expensive, and they are only any good if they are kept clean.
Using and Applying Oil
Never be tempted to use oil straight from the bottle: this is as bad as ‘double dipping’ crisps in a dip that you are sharing with friends. For this reason, you must dispense a very small amount of oil into an oil cup and use this to apply to the watches you’re cleaning. It is actually quite a task to get the oil out of the bottle in the first place.
I would suggest using a cotton bud stalk (with the bud removed) to transfer the oil from the bottle to the cup. If you cut the stalk in half, this can be stored in the container that the bottle comes in, thus avoiding any contamination from oil to oil.
This oil should normally be changed once a week to keep your oils dust and dirt free. To help preserve the life of your oil, its best to store your bottles in a box in your fridge (or other cool location if your partner objects) until needed for dispensing.
Tip: Best practice would be to use a separate oiler for different grades of oil to prevent cross contamination of one to the other. Alternatively you can clean the oiler’s tip by pushing it into some elder pith or king wood before using a different grade of oil.
There is also a polystyrene block (foam-absorbing cleaning block Bergeon 7011-BM) that seems to be getting more popular these days. All these can be brought from all material suppliers, or via the internet.
Controlling the amount of oil picked up by the oiler can be done firstly by changing the size of the oiler being used, and secondly by changing the speed with which you take the oil out of the oil pot. Thus if the oiler tip is dipped into and out of the pot quickly it will take up a large amount of oil, but dipped slowly it will take up just a small amount of oil.
If you require a tiny amount of oil, for example when applying oil to the pallet stones, you can wipe the oiler on one of your finger cots and there will still be enough oil to apply to something like the pallet stones.
Things to remember when oiling jewels: There should be a clear distinct ring of oil around the pivot. This, ideally, should be approximately one third of the oil sink’s capacity. The oil should just be visible, with a slight ring of oil around the pivot (not a puddle of oil), and no oil on the top flat surface around the oil sink or on the top of the pivot.
Tip: If you have smeared the oil, do not be tempted to use Rodico to remedy the situation, even if the product is recommended for this purpose. I have found that it never works as a long-term fix, as the oil still seems to spread after about two weeks. For best practice, I recommend that the parts are degreased and then reoiled.
I have tried all the short-cuts and none of them works, as the oil always spreads. If you have a tendency to get oil on the flat surface of the jewel when applying it, try wiping one side of the oiler, and using this side on the flat surface. This does mean that you may need to reapply more than once, but there is still less chance of getting the oil where you don’t want it to go.
Oiling A Watch After Cleaning
The Gear Train
Barrel and mainspring: Apply three large dots of grease to the inside of the barrel before fitting the spring, and give the same treatment to its cover. It is best to use Moebius 8200 (or Moebius D-5 if you’re on a budget). Before inserting the mainspring, remember to wipe clean the surface of the spring with degreaser or lighter fuel using a lint-free cloth.
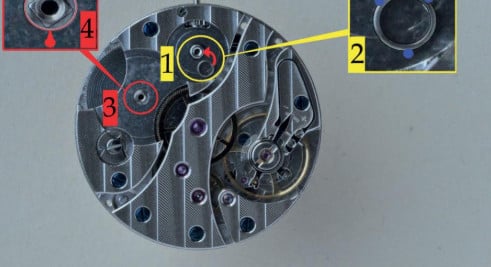
Barrel arbor (first wheel): Before fitting the arbor in the barrel, apply Moebius D-5/HP1300/ to the two middle shoulders. Fit the arbor in the barrel and then fit the cap. Next, apply a generous amount of oil (approximately two applications) to the large shoulder with the square, so you can see the oil.
On the smaller pivot, apply a small amount of oil. We do this because the bearing that the arbor sits in is very thin, and there is a high amount of pressure due to the torque of the mainspring. A large quantity of oil would be pushed out.
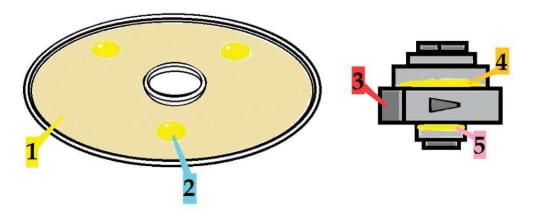
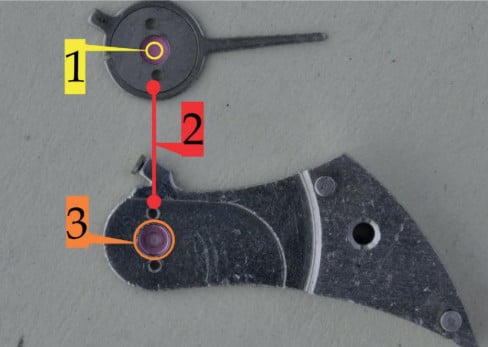
Centre wheel’s (second wheel’s) large shoulder: Before fitting the centre wheel into the main plate, you must apply Moebius D-5/9020 or HP 1300 oil to the large shoulder just after the pinion. It is important to do this as there is a high chance that when the cannon pinion is fitted, the oil may be sucked up in to the cannon pinion, leaving the centre wheel pivot dry if oiled from the front plate like a conventional pivot.
Mobius Hp1300. (4) Mobius Hp1300. (5) No oil. (6) Mobius Hp1300.
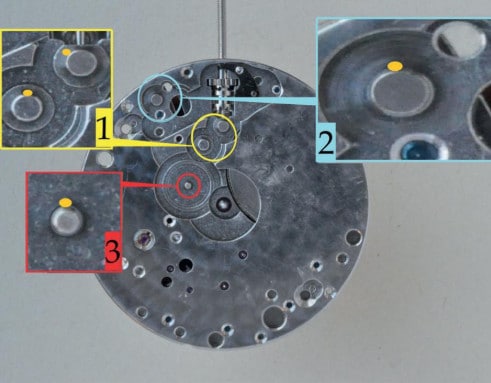
Third wheel: Applied to both pivots back and front. I would recommend using Moebius 9010 for the smaller ladies’ wristwatches.
Fourth wheel: Oil both pivots on both sides with Moebius 9010 on any size of watch.
The Escapement
Note: Before following these instructions, I would recommend that you first read the next section ‘Detailed Oiling of the Escapement’.
Escape wheel (fifth wheel): Oil both pivots on both sides with Moebius 9010 on any size of watch. If you have Fixodrop 8941, remember to treat the escape wheel before fitting it into the watch (this is not an oil, and oil must still be applied before assembly).
The escape wheel is the only gear in a watch that ever has its teeth lubricated. This is applied to the impulse faces of the pallets, which transfer the oil to the escape wheel.
The lever escapement design flaw is that it has sliding friction due to the transfer of energy from the escape wheel to the pallets. To reduce this friction a small amount of lubrication is needed. The lubrication needs to be as thin as possible so as not to cause what I call ‘sticktion’ between the escape wheel and the pallets. The action of the escapement needs to be a fast twitch to keep the amplitude of the balance at the desired level. The amount of oil applied to pallets is incredibly minute.
Pallet pivots: In modern horology, the pallet pivots are always left dry. In pocket watches or early wrist watches made before 1910, I would recommend using a very small amount of oil on watches larger than twelve lignes. Use Moebius 9010 or Moebius 941.
Pallet stones: Use a small amount of Moebius 941 or Moebius 9415, depending on the speed of the gear train. Apply to the impulse face of the exit pallet stone. If you have Fixodrop 8941, remember to treat the pallet stones before fitting them in the watch.
Balance pivots: Apply Moebius 9010 to both pivots. If you have an older watch with fixed end stones, treat the end stones with Fixodrop 8941 prior to fitting, as this will help with the retention of the oil. The oil is applied to the jewel on the opposite side of the end stone directly into the oil sinks.
The oil will need to be helped on to the end stone: to do this you will need a broken oiler sharpened into a gradual tapered point. Poke this into the pivot hole to break the surface tension of the oil, and you will see the oil disappear before your eyes.
To check the amount of oil, look through the end stone at a slight angle and you will be able to see a distinct ring of oil. This must cover between 50–70 per cent of the surface area of the end stone.
To oil shock-resistant bearings, the same amount of oil is used, but this time the oil is applied directly to the end stone. Any residue left on the oiler is applied to the chaton jewel hole (this is further explained in the chapter on ‘Cleaning and Oiling an Incabloc’).
Keyless Work
Bolt screw shoulder: Don’t forget to fit the bolt screw in the main plate before fitting the barrel bridge. Apply a small amount of oil to its shoulder just above the screw thread. Use Moebius HP1300/D-5.
Bolt spring claw and bolt pin: Use Moebius 9504 and apply sparingly. I like this grease as it is blue when applied, and after a month it turns white, making it very easy to apply, as you can almost paint it on the parts being lubricated. Alternatively, you can use very small amounts of Moebius HP1300/D-5/8301.
Return bar: Oil where the bolt piece pushes on it, and where the return bar spring pushes on it. Use Moebius 9504/D-5; all should be applied sparingly. Oil the post that the return bar rotates on, using Moebius HP1300/D-5/8301.
Sliding clutch and winding pinion: Use Moebius 9504. Apply sparingly between the mating saw-shaped teeth. You also need to apply a small amount of lubrication to the part of the winding pinion that rubs against the plate. Put three small dots of lubrication on the teeth of the winding pinion that mate with the upper crown wheel. (Alternatively, use Moebius 8301/D-5/ KT22.)
Winding stem: Apply Moebius 9504 sparingly to the pivot/square/shoulder, as well as the notch and the surface either side of the notch. This is pretty much all surfaces of the winding stem, except for the screw thread. Alternatively you could use Moebius D-5/8301.
Upper crown wheel: Apply three small dots of Moebius 9504 to the inside wall of the wheel or the boss that holds it down. Alternatively, use Moebius 8301/D-5.
Motion Work
Inside cannon pinion: Use Moebius D-5 or HP1300 (Cannon wheels use 9501 or Moebius D-5 mixed with 8301). Apply to the centre wheel post where the snap groove is located.
Tip: It’s hard to advise how much oil to apply to the cannon pinion as this only comes through experience. However, apply too much and you will have no hand friction at all, too little and the cannon pinion may seize. My best suggestion would be to use half the amount you used on the barrel arbor shoulders.
Minute wheel post: A small amount of Moebius HP1300/D-5 is applied to the post or the inside of the minute wheel.
Intermediate setting wheel (or wheels): A small amount of Moebius HP1300/D-5 is applied to the post(s).
Hour wheel: A small amount of Moebius HP1300/D-5/9020 is applied to the larger diameter of the cannon pinion or the inside of the hour wheel tube.
Detailed Oiling of the Escapement
There are two oils and one grease that can be used on the escapement:
Oils: Moebius 941/2. These two oils are only used on watches that beat more slowly than 19,800bph. As far as I can tell they’re both the same.
Grease: Moebius 9415 is used on the train of a watch that beats faster than 19,800bph.
The reason for using grease on the faster watches is that their fast-rotating escape wheel tends to ‘throw’ the conventional 941/2 oil, spraying it on the rest of the watch and leaving the pallets dry.
This sprayed oil tends to end up on the surface of the balance spring, making the coils stick together and causing the watch to run extremely fast. The 9415 grease will stay put as it is not a conventional grease – it is oilier. It also thins down under pressure, helping it stick to the escape wheel and pallets.
Applying the Oil
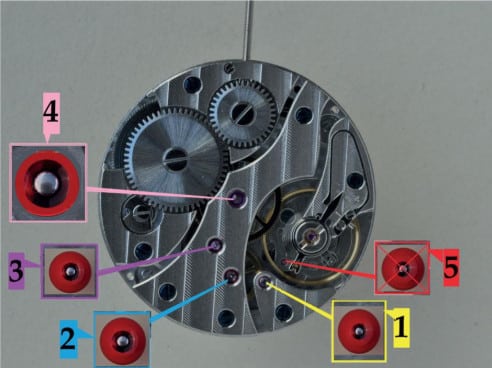
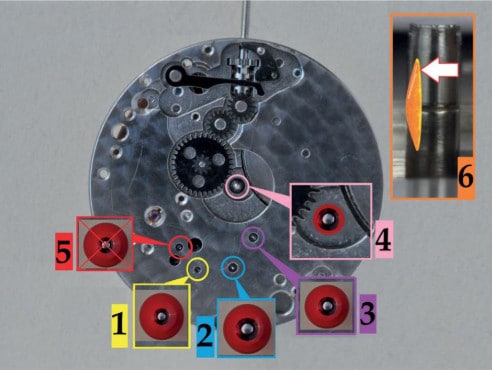
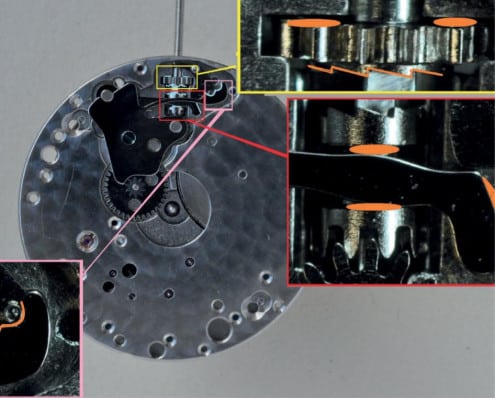
This job is made easier with the watch wound and the balance wheel removed, as the escapement will be stationary. You will need the smallest oiler you have, as the oiling is going to take place at right angles to the impulse face of the pallet stone. You can apply oil from above or below the baseplate (dial side) through two inspection holes that have been drilled into the plate for the purpose of oiling.
Turn the watch over to the dial side, locate the Incabloc or end stone and look at the next jewel. This will be the pallet jewel. The inspection holes are offset, slightly diagonally to the pallet jewel. These 1.5mm (approximately) holes allow you to see the pallet stones and allow the oiler to pass through, meaning oil application to the pallet stone is much easier.
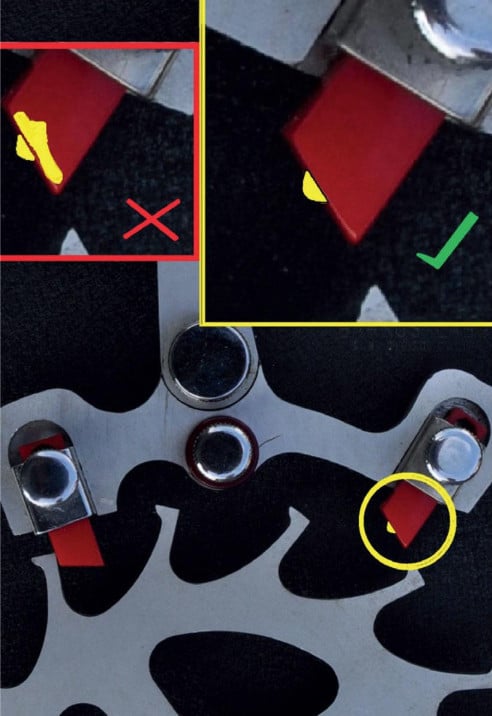
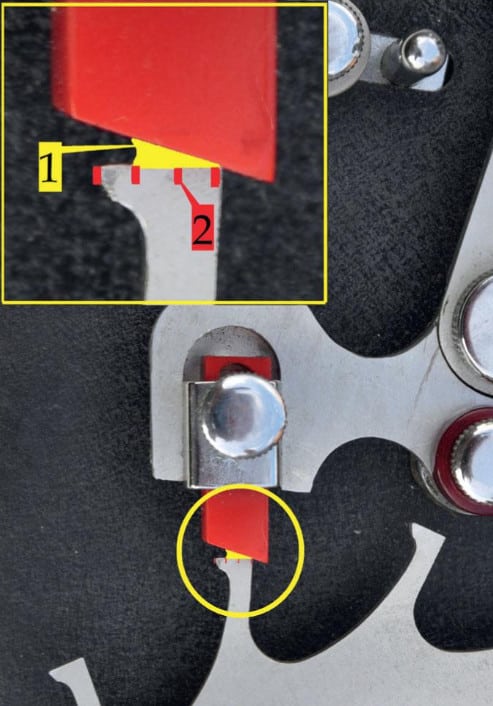
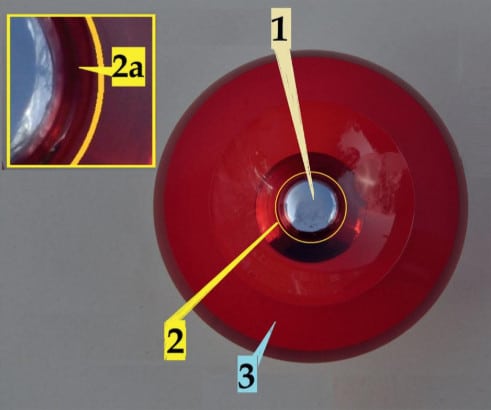
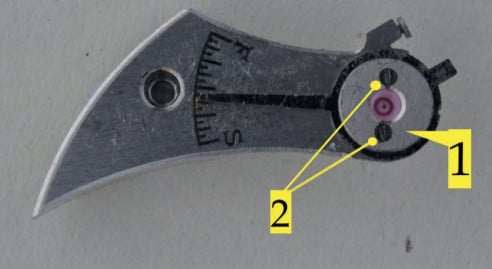
Image 2 shows the impulse plane divided in three parts.
It is the norm to apply the oil to the exit stone’s impulse plane. This is best delivered in small amounts. I find it best to pick up a small amount of oil on your oiler, wipe some of it off on to the top of your finger cot, and then use the oiler to apply it to the stone. Flick the pallets left five teeth and right five teeth manually. Reapply the oil. Repeat the movement twice.
If the oil has been properly applied, it should look something like Fig.209, where oil is only present on the impulse faces of the pallet stones, the impulse faces of the escape wheel teeth, and the locking face of the escape wheel. There should be none anywhere else.
Another reason for checking if you have applied the correct amount of oil to the pallets can be seen when impulse is given. The oil will form a ‘V’-shaped bubble between the pallet stone and the impulse plane of the escape wheel tooth. This is seen at the moment of impulse.
The correct amount of oil should fill between one third and two thirds of the length of the escape wheel’s impulse plane. If you see oil on anything other than the impulse plane or the locking face, then you will have to clean the pallets and escape wheel in a degreaser and repeat the operation until you get it right.
The Use of Fixodrop on the Escapement
Best practice would be the application of Moebius Fixodrop 8941. This is a treatment made to prevent the spreading of oil on metal. It has been used in watch repairing for many years and makes for easy application of oil to the pallet stones. It also keeps the oil in place for much longer and is very commonly used in service centres.
Put simply, Fixodrop is applied to the area where oil is not to be applied on the escapement. This means that when the oil is applied, it will all be ‘attracted’ to the spot where Fixodrop isn’t present. If you really struggle to get the application of oil on the pallets correct, this may be the way for you to go!
Fixodrop is not cheap and has a very low evaporation point, so when you decant it, only collect a thimbleful in an air-tight container. If used carefully, this amount can treat thirty or more watches.
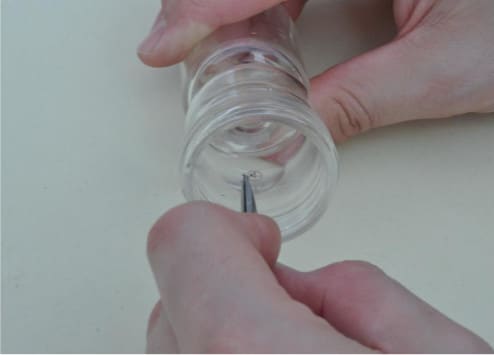
Ideally, Fixodrop is decanted into an hour glass-shaped bottle (as shown in Fig.18). The advantage of this bottle is that it reduces the evaporation rate of the Fixodrop, as well as being useful for its application. This bottle is normally used in conjunction with a plastic sieve-type basket, popped into the large chamber in the bottle with the lid screwed on.
The bottle is turned over and the parts are left to soak in the solution for a short time. Once the parts are removed from the bottle they are then dried in a stream of warm air (usually a hairdryer). This prevents any damp air being trapped between the metal’s surface and the application of the Fixodrop, as this may cause surface rust later on.
Some professional watchmakers treat multiple parts in Fixodrop, and this is why a basket is used. The problem with this is that the basket is also treated with the product, meaning the Fixodrop gets used up much more quickly. I prefer not to use this method for exactly this reason.
Instead, I use the hour-glass bottle by shaking a small puddle of the liquid into the top chamber with the lid on. Next, carefully unscrew the lid (keeping the Fixodrop in the topchamber). Hold the bottle at a slight incline, and then just dip the escape wheel in the solution for a few seconds.
Dry the object in warm air. Treat the pallet stone in the same manner. Once you have refitted both the pallets and escape wheel and there is power in the gear train, flick the pallets left and right for one complete revolution of the escape wheel, as this will chip off the Fixodrop from the impulse planes of both the pallets and escape wheel where they make contact.
Warning! Fixodrop must not be applied to the pallet pivots or fork area. Only the stones must be treated, otherwise this will lead to excessive wear. You must not forget to apply oil to the pallet stones because otherwise the watch will grind to a halt within twenty-four hours. This certainly helps to remind you to oil the pallets!
Oiling the Pallet Stones
Dip the oiler into your pallet oil (remembering to wipe off some of this on to the top of your finger cot).The oil is best applied to the exit stone. As you will probably see, it tends to form a peak on the first four escape wheel teeth, due to the application of Fixodrop.
These little blobs of oil can transfer on to the belly of the pallet frame, which will then spread on to the balance spring, making the coils stick together and causing the watch to run very fast.
You will also notice that as the oil is applied to the pallet stone, it is almost as if it is attracted to the impulse plane of the pallet. This is because the Fixodrop is only present on the outer edges of the impulse plane. Oil will have to be applied two or three times, until the desired amount of oil is present, just as if you weren’t using Fixodrop.
Tip: Instead of applying the oil (with Fixodrop present) to the pallet stones, you can apply it to the teeth of the escape wheel’s impulse planes, as the Fixodrop has been removed from these impulse planes. Some people find this much easier.
Warning: If you immerse the whole of the pallet frame in Fixodrop this will have the adverse effect of wearing out the impulse pin. This is due to the Fixodrop being present in the notch of the pallet’s frame, and this eventually turns into a powder, which will slowly grind down the impulse pin.
If any powder residue is left on the escape wheel and pallets, this is not an issue as it is made inert later on, when mixed with the oil applied to the pallet stones. If you accidently dipped the whole frame into the Fixodrop, you can remove it by rubbing the surface with some peg wood and cleaning off any residue with degreaser.
Tip: Replace the bottle’s lid as soon as possible. When storing your decanted Fixodrop, keep it out of direct sunlight and in a cool place to prevent it from evaporating. Fixodrop bottles can be quite expensive, so any small airtight container can be used (such as a mini jamjar). Alternatively they can be purchased directly (and more cheaply) from A1 Scientific Instruments in Enfield.
Moebius oils and grease buy online with worldwide shipping ✔️